Hyperscalper 是我为 Hyperliquid DEX(去中心化交易所)构建的专业加密货币交易终端。它的独特之处在于完全运行在客户端——没有后端服务器,没有中间商。你的私钥永远不会离开浏览器。
在这篇文章中,我将讲解关键的架构决策、我实现的不同下单方式,以及实时市场扫描器的工作原理。
为什么选择完全客户端?
当你在构建一个处理私钥的交易应用时,信任就是一切。我做了一个慎重的决定:零后端。
信任问题
传统交易平台需要你将凭证托付给它们。即使采用最佳安全实践,总还是存在一个可能被攻破的服务器、一个可能被泄露的数据库、或者一个可能叛变的员工。
使用 Hyperscalper,数据流非常简单:
浏览器 → Hyperliquid DEX API
就这样。没有中转服务器,没有代理,没有后端数据库。
私钥如何保护
虽然一切都在浏览器中运行,但我仍然需要对存储在 localStorage 中的私钥进行强加密。方案如下:
// 使用 PBKDF2 密钥派生的 AES-GCM 加密Const deriveKey = async (password: string, salt: Uint8Array) => {const keyMaterial = await crypto.subtle.importKey('raw',new TextEncoder().encode(password),'PBKDF2',false,['deriveBits', 'deriveKey']);return crypto.subtle.deriveKey({name: 'PBKDF2',salt,iterations: 100000, // 让暴力破解变得极其昂贵hash: 'SHA-256'},keyMaterial,{ name: 'AES-GCM', length: 256 },false,['encrypt', 'decrypt']);};
系统在首次使用时会生成一个设备专属的密钥,存储在 localStorage 中。用户可以选择添加密码作为额外保护。即使有人窃取了 localStorage 数据,每次猜测都需要经过100,000次 PBKDF2 迭代。
取舍
完全客户端有其代价:
- 零信任要求 — 但无法运行服务端机器人
- 不收集数据 — 但订单历史依赖交易所 API
- 真正的去中心化 — 但所有计算都在浏览器中完成
- 零服务器成本 — 但无法做大量回测
对于一个以速度为核心的剥头皮交易终端来说,这些取舍完全合理。浏览器到 Hyperliquid 之间的延迟才是唯一重要的。
下单方式
不同的交易者有不同的工作流。有人喜欢点击,有人使用快捷键,还有人想要自动化的阶梯挂单。我实现了五种不同的下单方式。
图表点击下单
有时候你想在图表上看到的某个价格水平直接下单。我实现了一个十字光标系统,让操作非常直观:
Const handleChartClick = (params) => {if (!crosshairActive) return;const price = params.price;const isBuy = price < currentPrice;placeLimitOrderAtPrice({symbol,price,isBuy,percentage: settings.orderSizePercent});setCrosshairActive(false);};
点击当前价格下方 = 买入限价单。点击上方 = 卖出限价单。简洁直观。
Cloud 阶梯挂单(DCA)
这是标志性功能。Cloud 订单不是下一个单一的挂单,而是在当前价格下方(买入)或上方(卖出)按间隔排列5个限价单。
Const buyCloud = async ({ symbol, currentPrice, priceInterval, percentage }) => {const ORDER_COUNT = 5;const TAKE_PROFIT_PERCENT = 2;const orders = [];for (let I = 0; I < ORDER_COUNT; I++) {const price = currentPrice - (priceInterval * I);const size = totalSize / ORDER_COUNT;orders.push({type: 'limit',side: 'buy',price,size,reduceOnly: false});// 自动止盈,利润 2%orders.push({type: 'limit',side: 'sell',price: price * (1 + TAKE_PROFIT_PERCENT / 100),size,reduceOnly: true});}await Promise.all(orders.map(o => submitOrder(o)));};
价格间隔根据最近的 K 线高度计算——系统会自动适应当前的波动率。
键盘快捷键
对于速度型交易者来说,去够鼠标太慢了。我将所有常用操作映射到了快捷键上:
UseEffect(() => {const handleKeyDown = (e: KeyboardEvent) => {if (e.metaKey || e.ctrlKey) {switch (e.key) {case 'b':e.preventDefault();inverted ? SellCloud() : buyCloud();break;case 's':e.preventDefault();inverted ? BuyCloud() : sellCloud();break;case 'e':e.preventDefault();closePosition(25); // 平仓 25%break;}}};window.addEventListener('keydown', handleKeyDown);return () => window.removeEventListener('keydown', handleKeyDown);}, [inverted]);
注意 inverted 检查——后面会详细解释。
乐观更新
没人想等500毫秒的 API 响应才看到反馈。我实现了乐观更新(Optimistic Updates):
Const placeOrder = async (order) => {// 1. 立即在 UI 中显示const optimisticId = crypto.randomUUID();addOptimisticOrder({ ...order, id: optimisticId });showToast('正在下单...');try {// 2. 实际提交到交易所const result = await submitToHyperliquid(order);// 3. 用真实结果替换乐观数据removeOptimisticOrder(optimisticId);addConfirmedOrder(result);playSuccessSound();} catch (error) {// 4. 失败则回滚removeOptimisticOrder(optimisticId);showErrorToast(error.message);}};
无论网络延迟如何,UI 都能在100毫秒内响应。
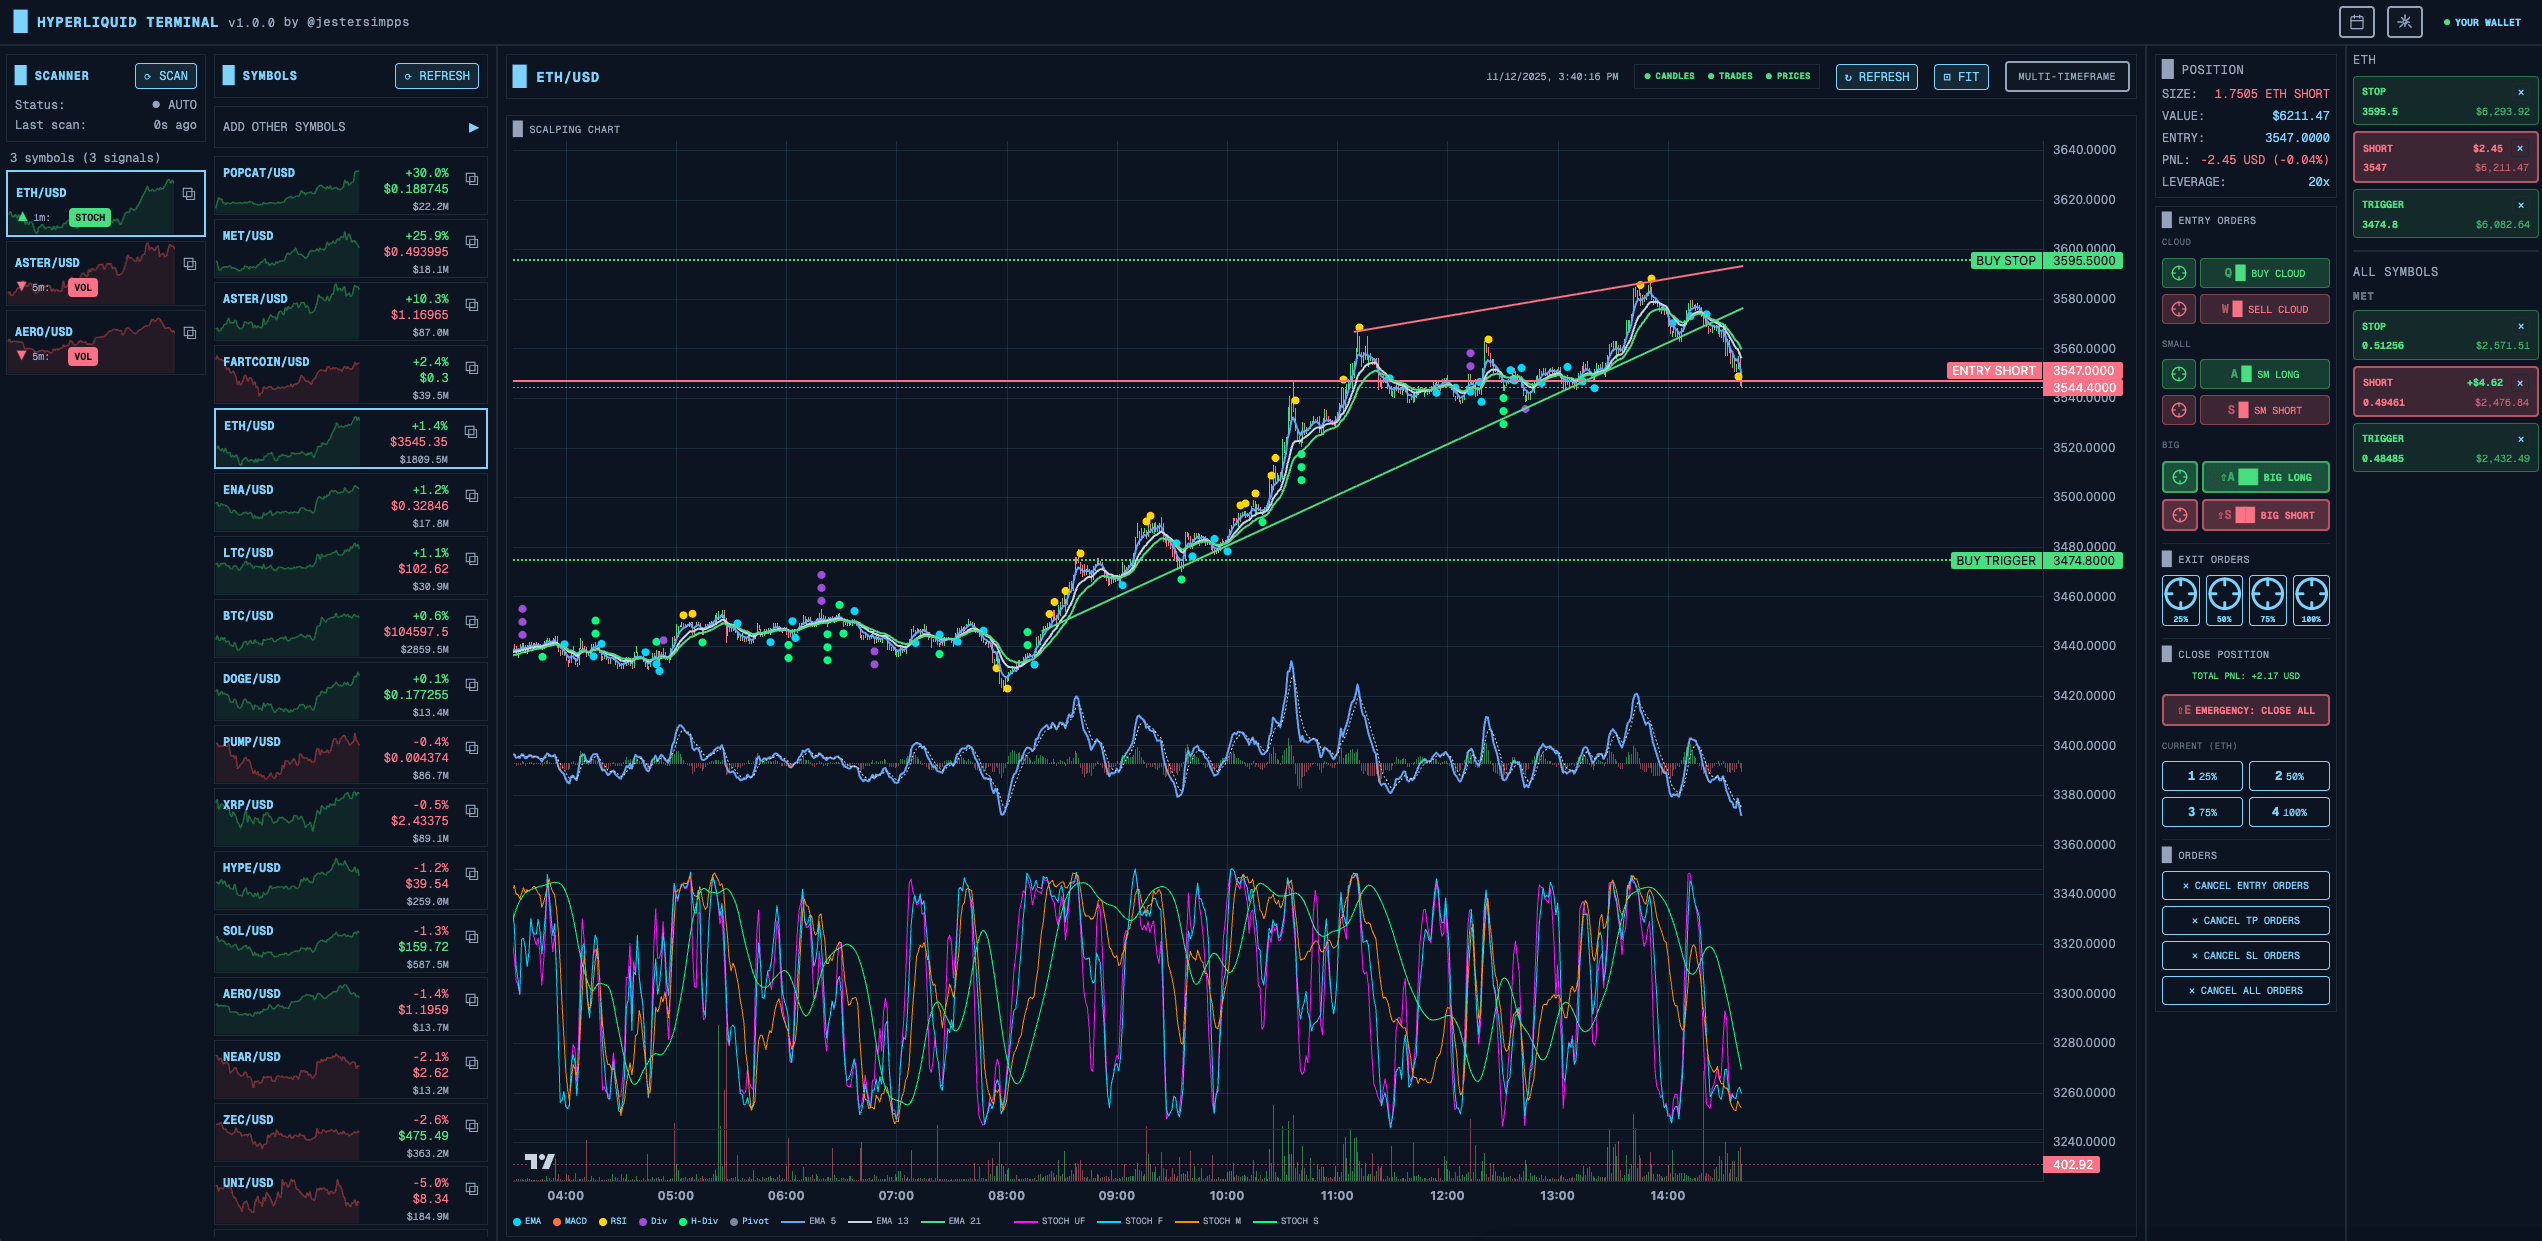
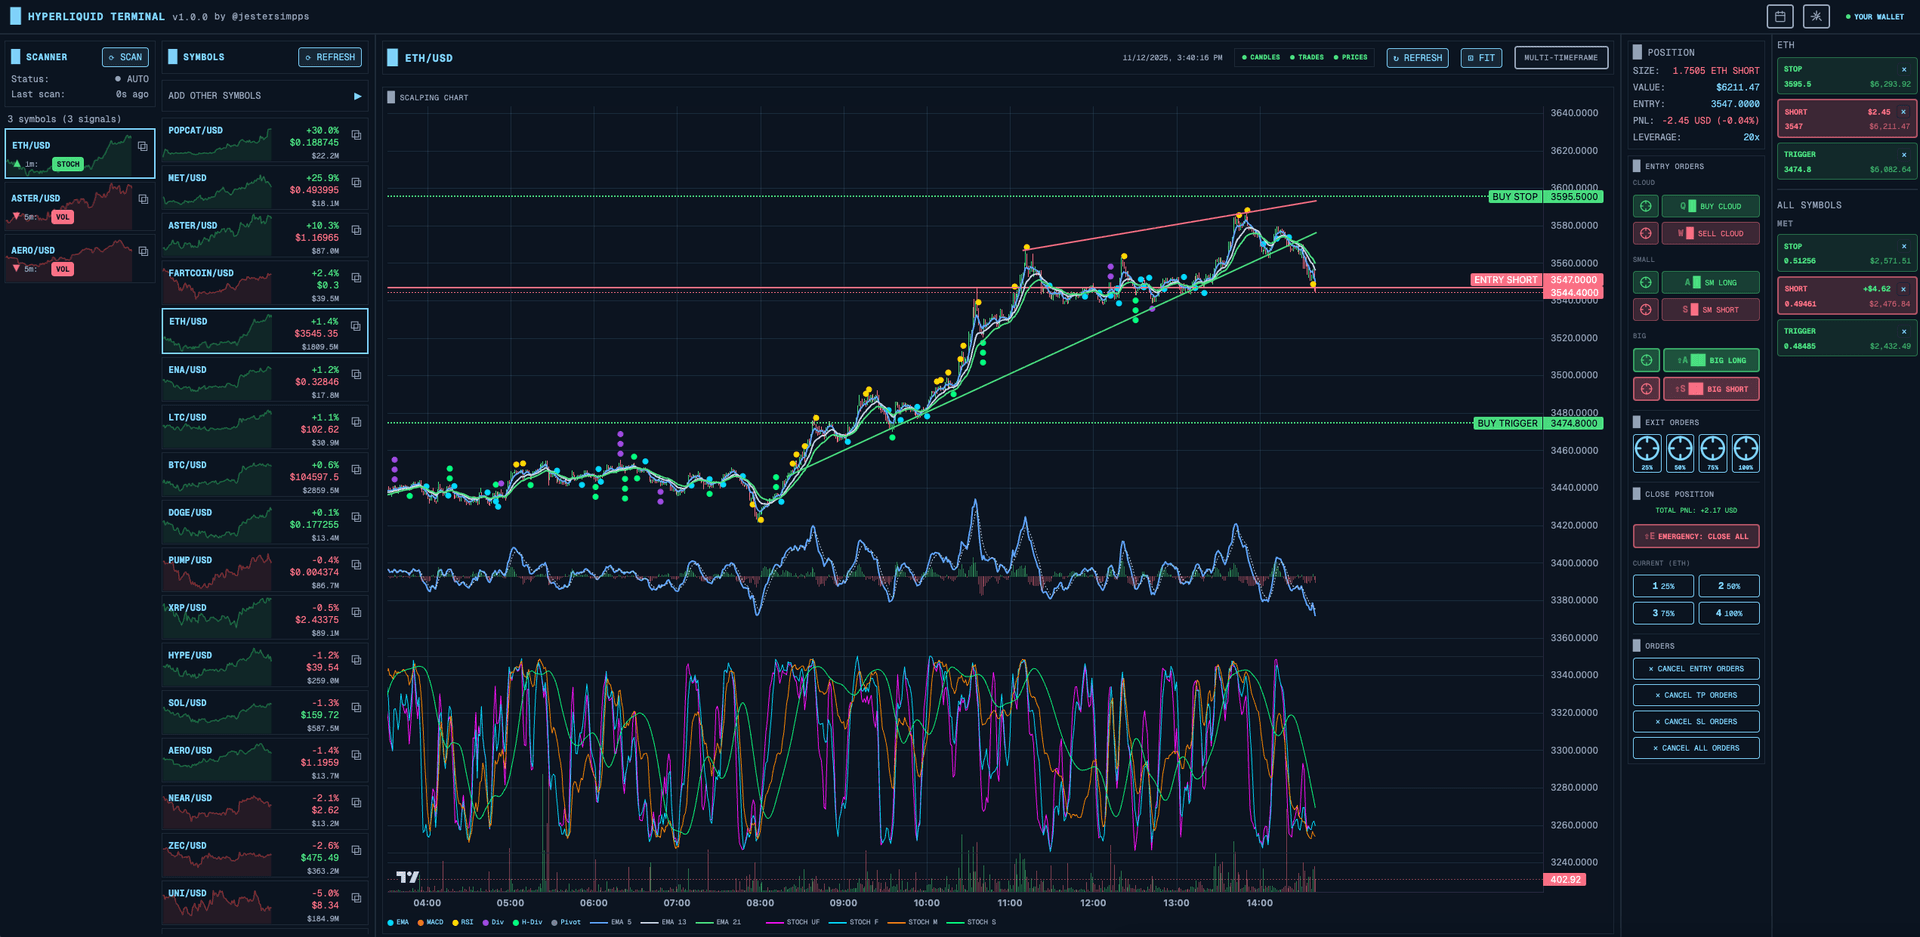
市场扫描器
一个交易终端的好坏取决于它发现机会的能力。我构建了8种不同类型的扫描器,实时覆盖所有交易对。
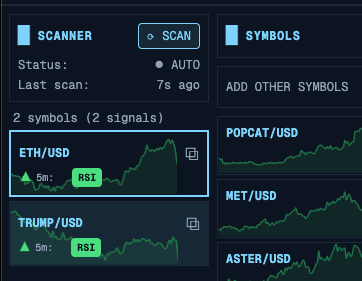
扫描器架构
每个扫描器通过 WebSocket 订阅 K 线数据,并在每次更新时运行分析:
// 共享 WebSocket 连接(单例模式)Const ws = getWebSocketService();// 订阅所有交易对的多个时间周期Symbols.forEach(symbol => {['1m', '5m', '15m', '1h'].forEach(timeframe => {ws.subscribeToCandles(symbol, timeframe, (candles) => {runScanners(symbol, timeframe, candles);});});});
随机指标扫描器
随机指标(Stochastic Oscillator)非常适合发现超卖/超买状态。我实现了四个不同周期的变体:
Const scanStochastic = (candles, config) => {const variants = {ultraFast: { period: 5, smoothK: 2, smoothD: 2 },fast: { period: 9, smoothK: 3, smoothD: 3 },medium: { period: 14, smoothK: 3, smoothD: 3 },slow: { period: 21, smoothK: 5, smoothD: 5 }};const signals = [];Object.entries(variants).forEach(([name, params]) => {if (!config.variants[name].enabled) return;const stoch = calculateStochastic(candles, params);const current = stoch[stoch.length - 1];const previous = stoch[stoch.length - 2];// 看涨:K 线在超卖区域向上穿越 D 线if (current.k > current.d &&previous.k <= previous.d &¤t.k < config.oversoldLevel) {signals.push({type: 'stochastic',variant: name,direction: 'bullish',strength: (config.oversoldLevel - current.k) / config.oversoldLevel});}});return signals;};
背离检测
背离(Divergence)是非常强大的信号——当价格创出新低但 RSI 创出更高的低点时,通常预示着反转。这需要更复杂的逻辑:
Const detectDivergence = (candles, rsiValues) => {const pricePivots = findPivots(candles, 3);const rsiPivots = findPivots(rsiValues, 3);const divergences = [];const recentPriceLows = pricePivots.filter(p => p.type === 'low').slice(-5);for (let I = 1; I < recentPriceLows.length; I++) {const current = recentPriceLows[I];const previous = recentPriceLows[I - 1];// 价格创出更低的低点if (current.price < previous.price) {const currentRsi = findClosestPivot(rsiPivots, current.index);const previousRsi = findClosestPivot(rsiPivots, previous.index);// RSI 创出更高的低点 = 看涨背离if (currentRsi.value > previousRsi.value) {divergences.push({type: 'regular_bullish',pricePoints: [previous, current],rsiPoints: [previousRsi, currentRsi],strength: calculateDivergenceStrength(...)});}}}return divergences;};
性能优化
在4个时间周期上对500多个交易对运行8个扫描器,分分钟就能拖垮浏览器性能。我使用了几种优化手段:
带 TTL 的缓存:
Const memoizedCalculate = createMemoizedFunction(calculateStochastic,(candles, period) => `stoch-${candles.length}-${period}`,100, // 最大缓存条目数60000 // 60秒后过期);
防抖的背离检测:
// 不要每个 tick 都重新计算Const debouncedDivergence = useDebouncedCallback(detectDivergence,1000 // 最后一次更新后等1秒);
虚拟滚动渲染结果:
<FixedSizeListheight={600}itemCount={signals.length}itemSize={60}>{({ index, style }) => (<SignalItem signal={signals[index]} style={style} />)}</FixedSizeList>
多时间周期分析
最强大的功能之一是多时间周期视图。同时查看同一个交易对的1分钟、5分钟、15分钟和1小时图,有助于识别信号的共振。
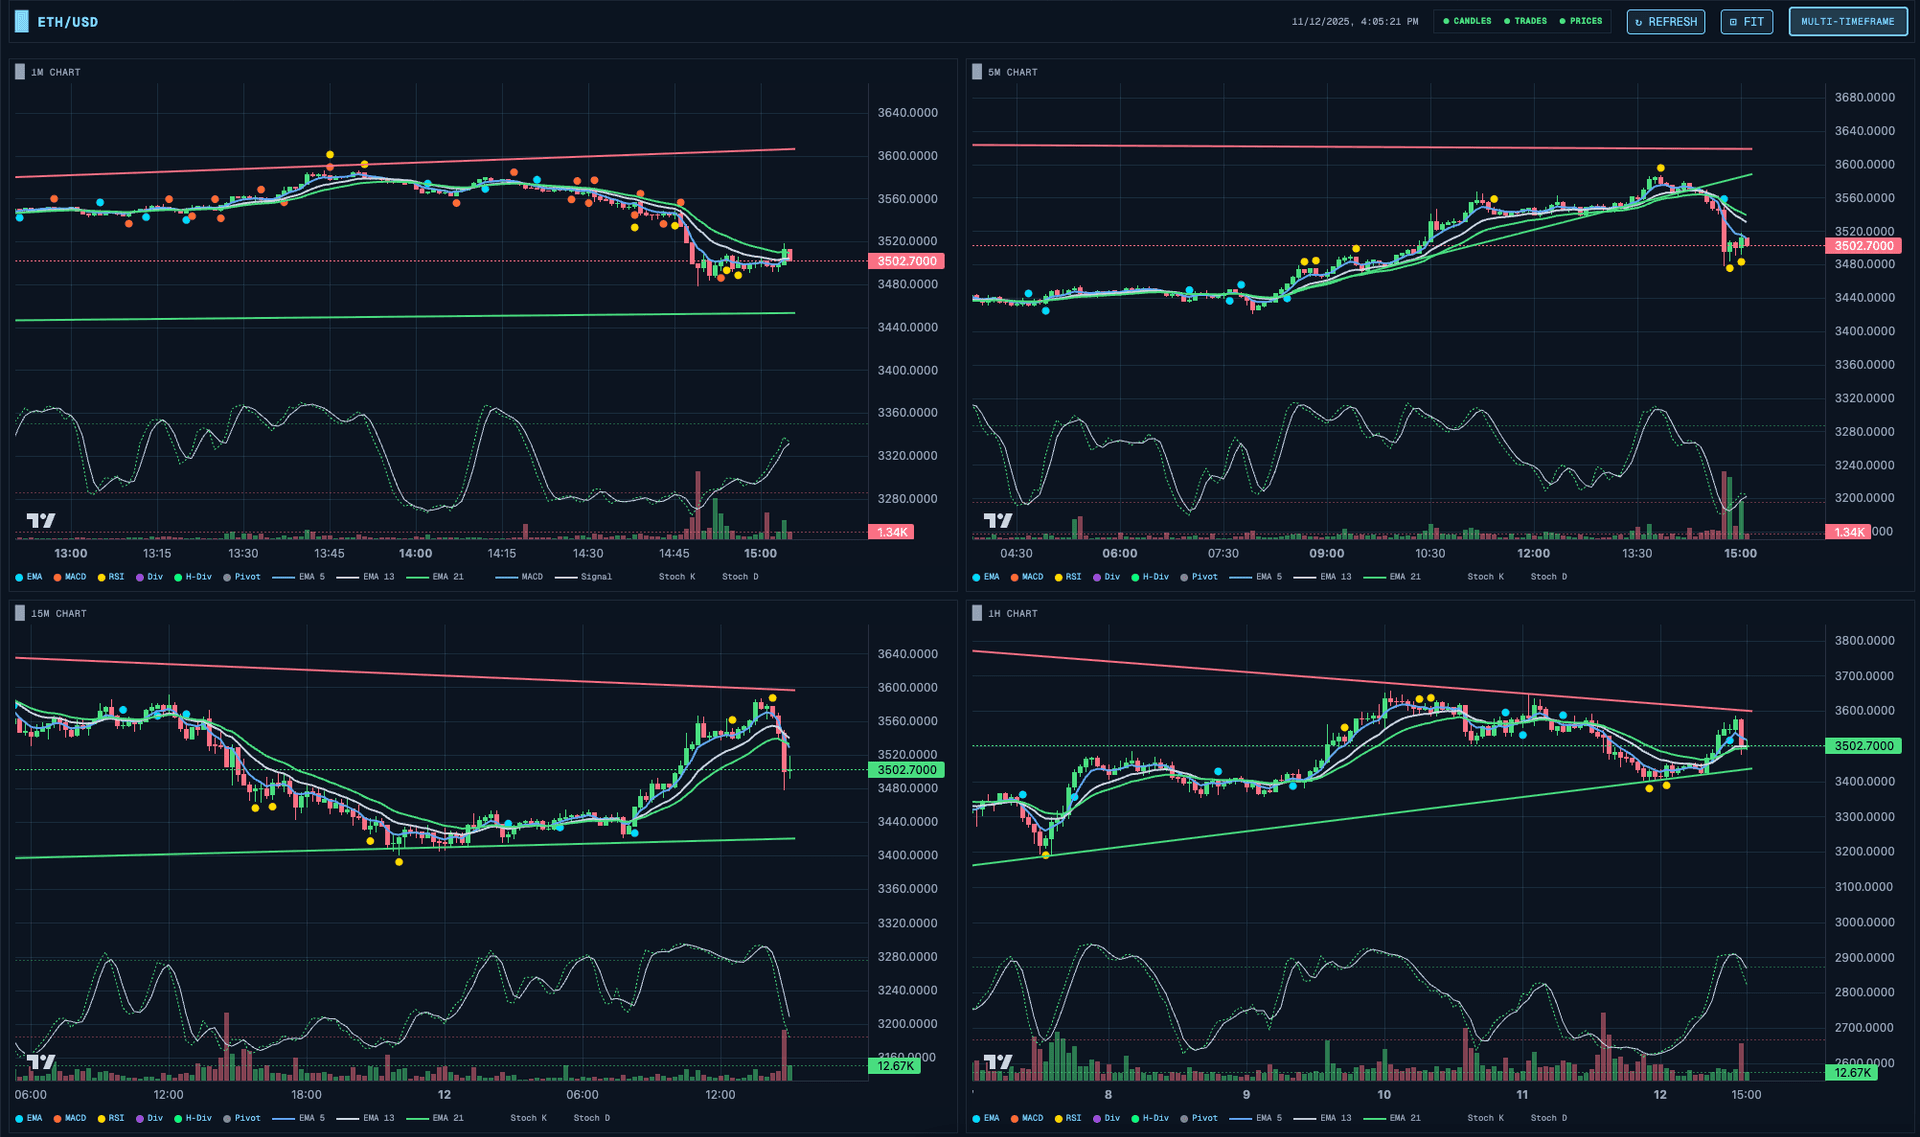
所有图表是同步的——当你缩放或平移一个图表时,其他图表会跟随。这通过一个共享的图表同步 store 实现:
Const useChartSyncStore = create((set) => ({timeRange: null,setTimeRange: (range) => set({ timeRange: range }),}));// 在每个图表组件中UseEffect(() => {const unsubscribe = useChartSyncStore.subscribe((state) => state.timeRange,(range) => {if (range) chart.timeScale().setVisibleRange(range);});return unsubscribe;}, [chart]);
支撑和阻力线
自动趋势线检测听起来简单,但实际上有很大的深度。我实现了三种互补的方法。
基于枢轴点的趋势线
最直观的方法:找到枢轴点(Pivot Points),然后通过它们画线。
Const detectPivots = (candles, strength = 3) => {const pivots = [];for (let I = strength; I < candles.length - strength; I++) {const current = candles[I];let isHigh = true;for (let j = I - strength; j <= I + strength; j++) {if (j !== I && candles[j].high >= current.high) {isHigh = false;break;}}if (isHigh) {pivots.push({ index: I, price: current.high, type: 'high' });}// 低点同理...}return pivots;};
包络线验证
一条被频繁突破的支撑线没什么用。我会对所有 K 线进行验证:
Const findBestSupportLine = (pivots, candles) => {let bestLine = null;let bestScore = -Infinity;for (let I = 0; I < pivots.length - 1; I++) {for (let j = I + 1; j < pivots.length; j++) {const line = createLine(pivots[I], pivots[j]);let touches = 0;let violations = 0;candles.forEach((candle, idx) => {const linePrice = getLineValueAt(line, idx);const tolerance = linePrice * 0.002;if (candle.low < linePrice - tolerance) {violations++;} else if (Math.abs(candle.low - linePrice) < tolerance) {touches++;}});const score = touches * 10 - violations * 100;if (score > bestScore && violations === 0 && touches >= 3) {bestScore = score;bestLine = line;}}}return bestLine;};
关键洞察:一条零突破的支撑线远比一条有很多触碰但偶尔被突破的线更有价值。
交易分析
追踪表现对于提升交易水平至关重要。Hyperscalper 提供每日和每月的盈亏概览:
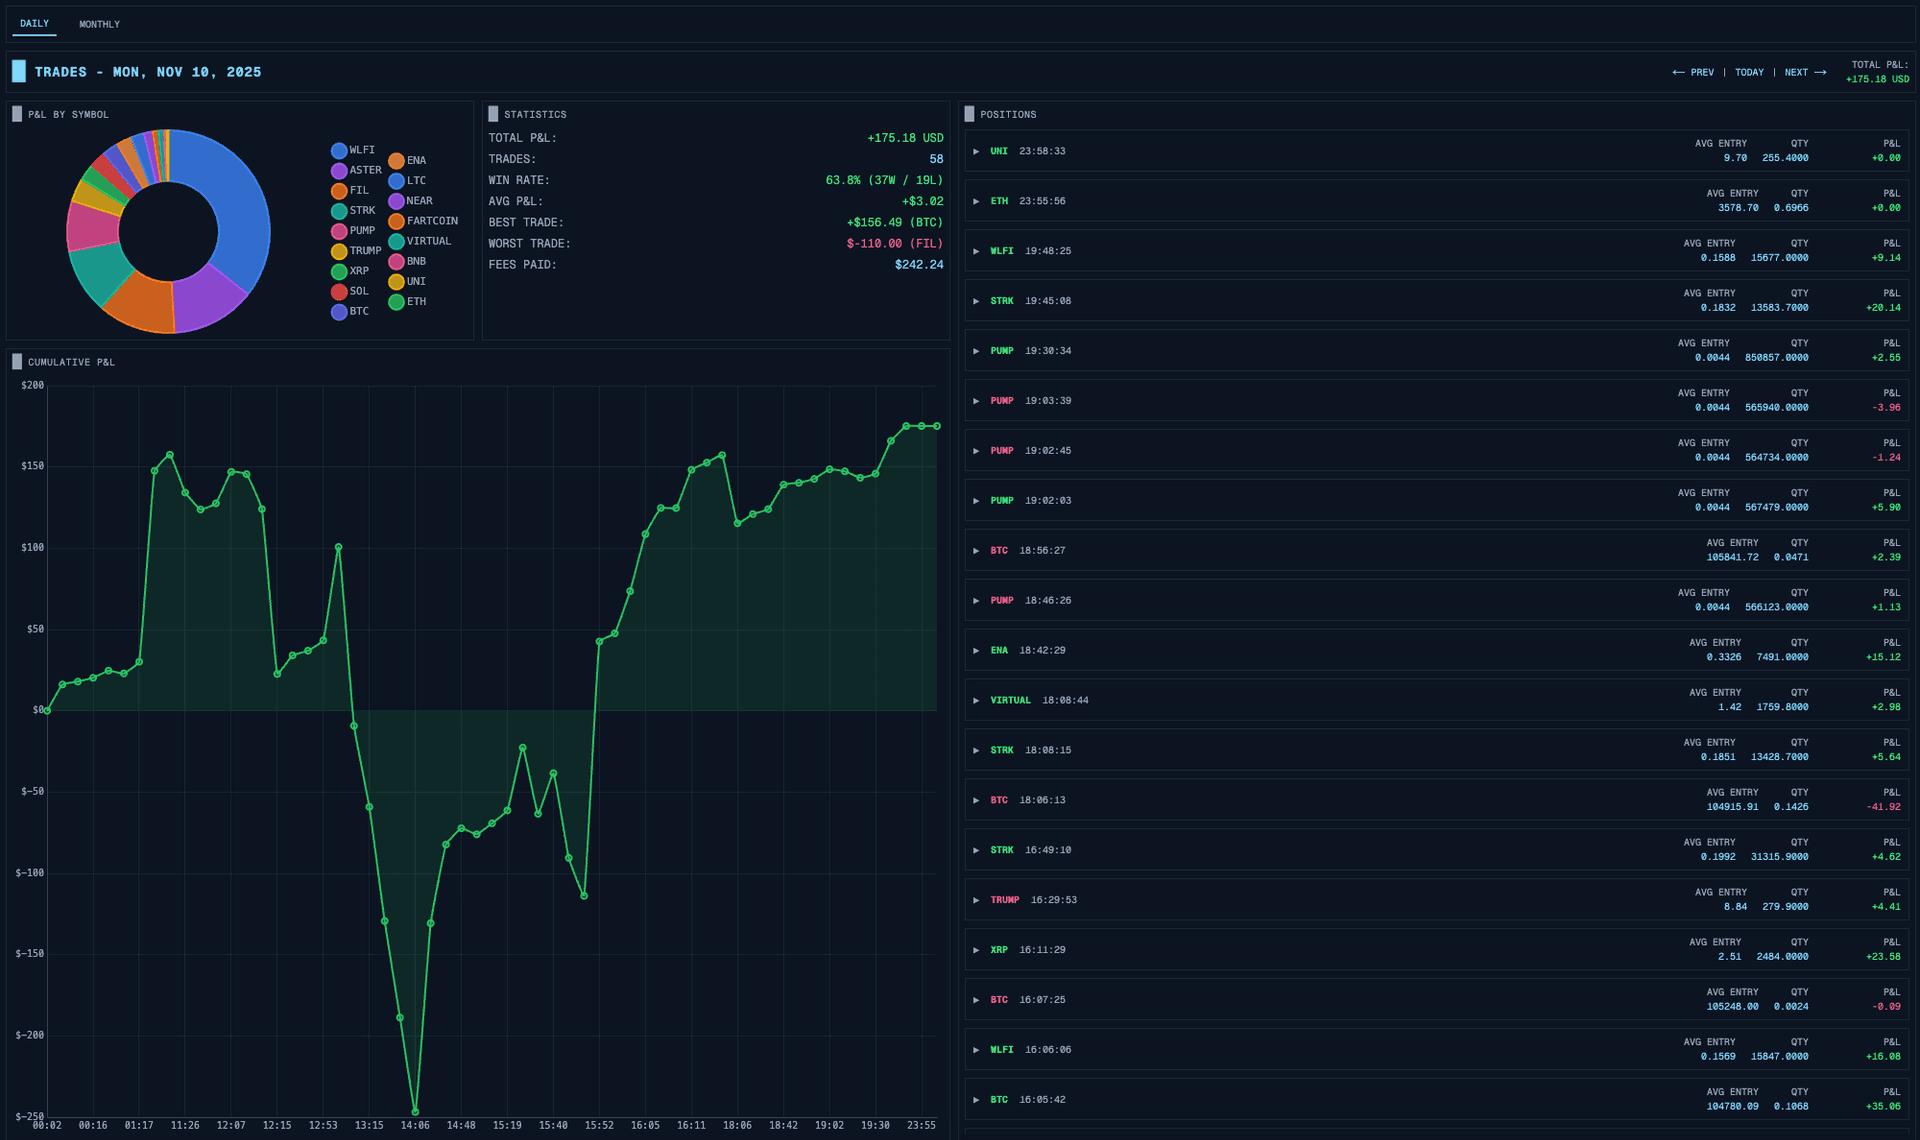
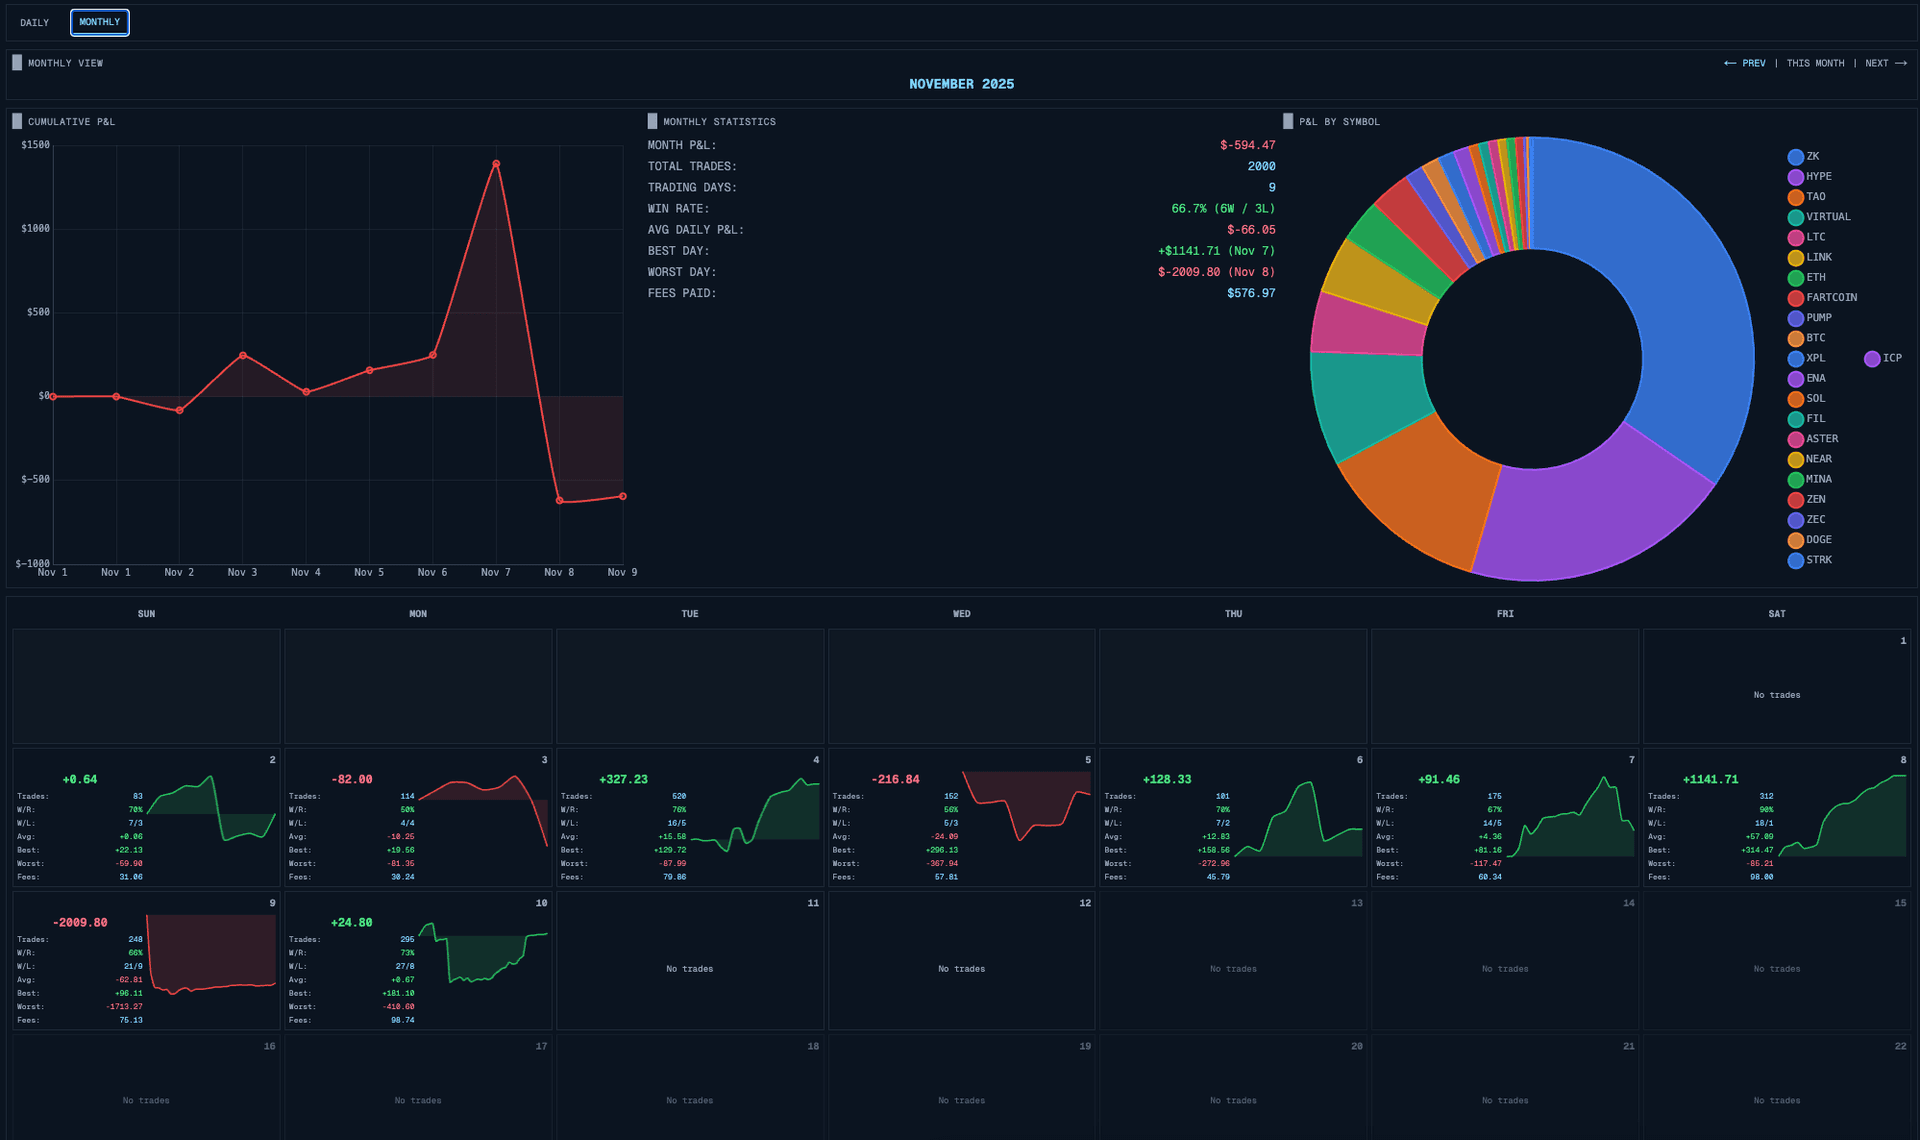
所有数据都直接来自 Hyperliquid 的 API——不需要后端存储。
反转模式
这是一个从实际交易经验中诞生的功能:反转模式(Inverted Mode)。
当你是一个偏好做空的交易者时,标准 UI 是让人困惑的。绿色表示价格上涨(对空头不利),红色表示下跌(对空头有利)。看涨信号其实是做空机会。
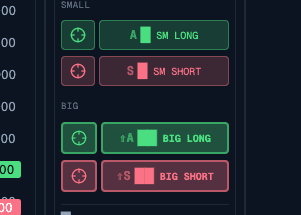
反转模式会翻转一切:
Const getSignalColor = (signal, inverted) => {const isBullish = signal.direction === 'bullish';if (inverted) {// 看涨信号 = 做空机会 = 显示为"好的"(绿色)return isBullish ? Colors.bearish : colors.bullish;}return isBullish ? Colors.bullish : colors.bearish;};
K 线颜色、信号指示器,甚至支撑/阻力标签的语义都会翻转。做空交易者看到的图案和做多交易者一样,只是按照他们的偏好正确解读了。
多显示器支持
专业交易者通常使用多个显示器。Hyperscalper 支持将图表弹出到独立窗口:
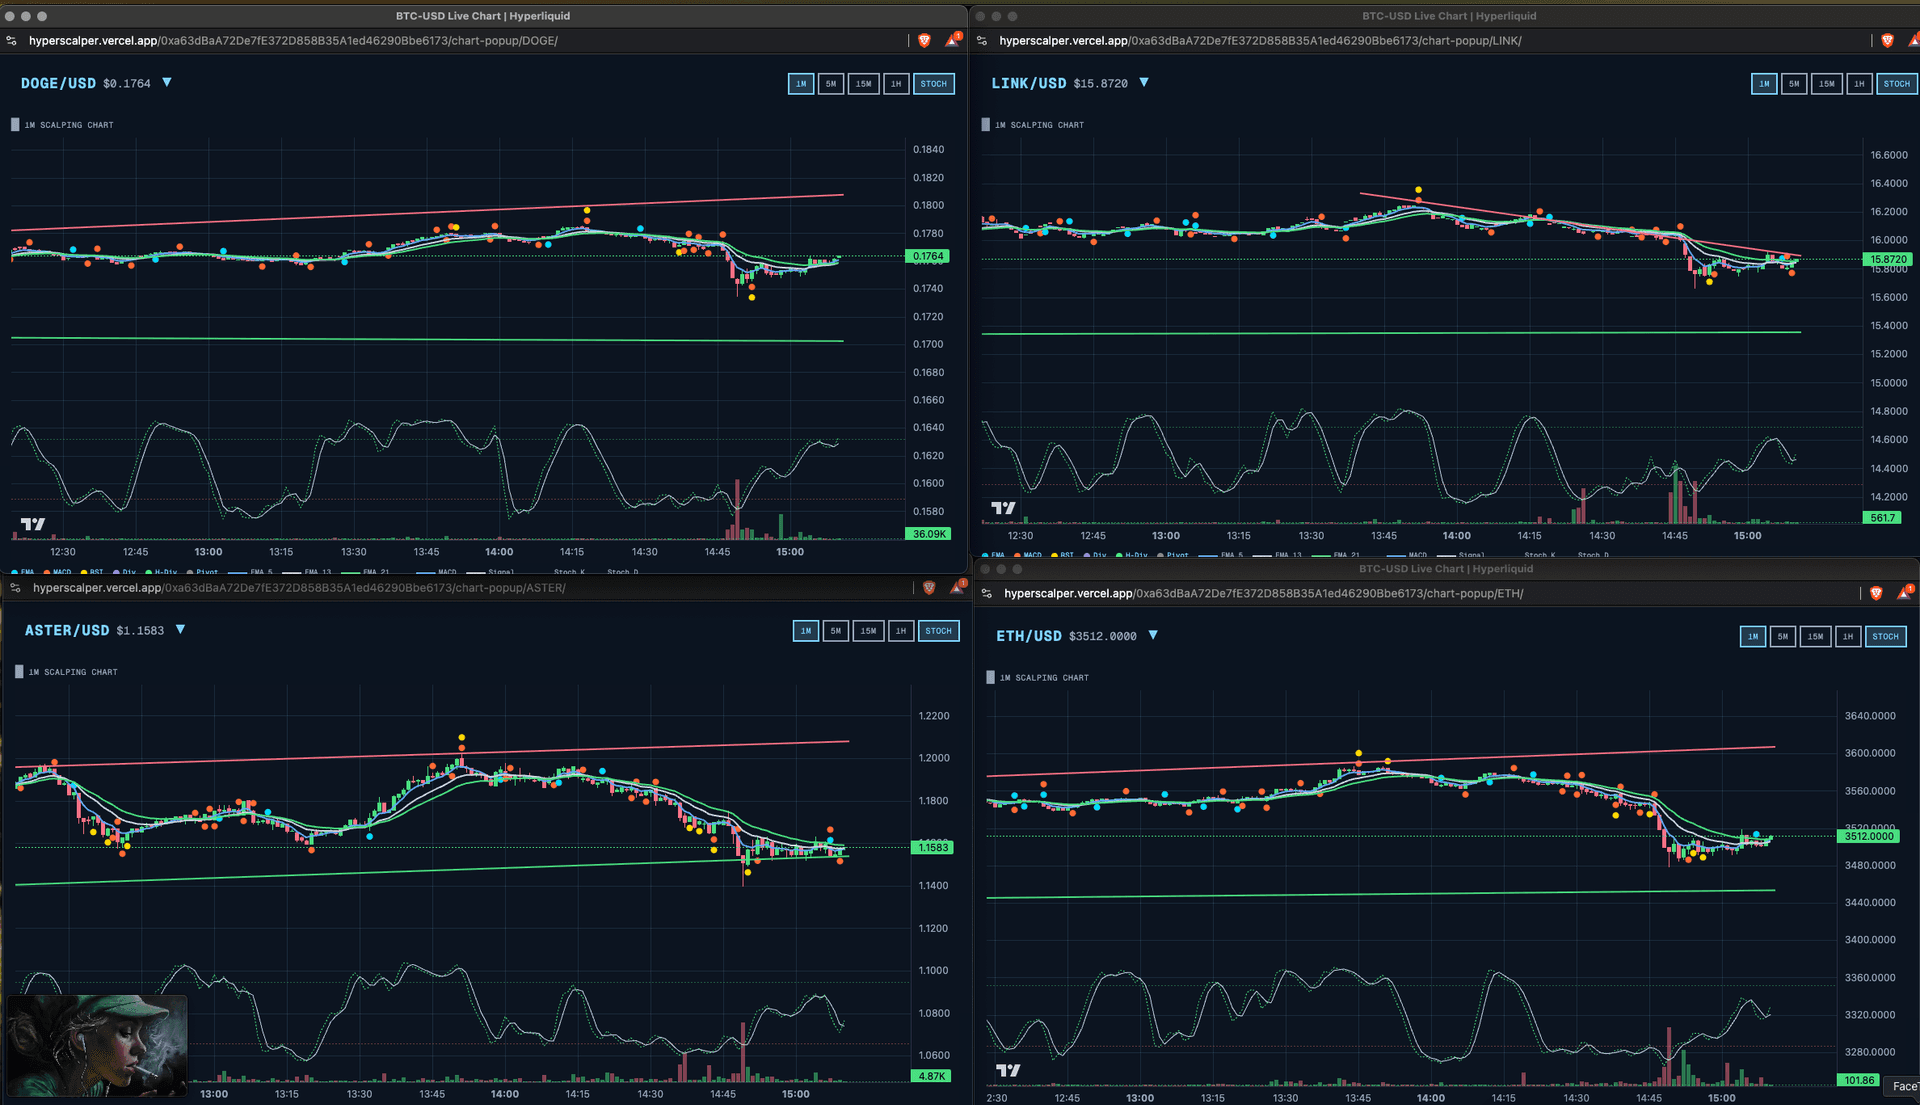
每个弹出窗口维护自己的 WebSocket 连接,并通过 BroadcastChannel 与主窗口同步状态:
Const channel = new BroadcastChannel('hyperscalper-sync');// 主窗口广播状态变更Channel.postMessage({ type: 'POSITION_UPDATE', data: positions });// 弹出窗口监听Channel.onmessage = (event) => {if (event.data.type === 'POSITION_UPDATE') {setPositions(event.data.data);}};
使用 Zustand 进行状态管理
拥有20多个 store 管理不同领域的数据时,我需要一个轻量级的状态管理方案。Redux 太重了。我选择了 Zustand:
Const useTradingStore = create<TradingStore>((set, get) => ({orders: [],positions: [],addOrder: (order) => set((state) => ({orders: [...state.orders, order]})),closePosition: async (symbol, percentage) => {const position = get().positions.find(p => p.symbol === symbol);if (!position) return;const size = position.size * (percentage / 100);await submitMarketOrder({symbol,side: position.side === 'long' ? 'sell' : 'buy',size,reduceOnly: true});}}));
每个 store 只关注一个领域:交易、订单、持仓、K 线、扫描器、设置等。组件只订阅它们需要的数据。
经验总结
构建 Hyperscalper 让我学到了几件事:
1. 客户端可以足够了。 对于信任至关重要的应用来说,消除后端不仅可行——而且更好。
2. 乐观更新是必须的。 在交易中,500毫秒的延迟感觉像一个世纪。先显示反馈,之后再对账。
3. 多种输入方式很重要。 不同的交易者有不同的工作流。有人点击,有人用快捷键,有人想要自动化。全部支持。
4. 性能优化是强制性的。 对500个交易对实时运行技术分析需要仔细关注缓存、防抖和虚拟渲染。
5. 反向思维有帮助。 为做空交易者构建功能迫使我质疑关于"上涨"和"好"的固有假设。最终得到了一个更灵活的系统。
Hyperscalper 已在 hyperscalper.vercel.app 上线,欢迎体验。代码证明了专业级交易工具完全可以在浏览器中运行——不需要后端。
Stay Updated
Get notified about new posts on automation, productivity tips, indie hacking, and web3.
No spam, ever. Unsubscribe anytime.